Carletta Trains
Layout Mistakes to Avoid
Mistakes are unavoidable even with the best planning. Sometimes they are easily fixed and sometimes it requires you to go back to the drawing board. There are also some mistakes you cannot fix without serious repercussions so you decide to love with them. Here are some of the mistakes I made that hopefully you will be able to avoid. I learned a lot from my mistakes and as a result, my Z scale layout came out virtually mistake free.
Easily Fixable Mistakes
By now most of my easily fixable mistakes have been corrected. I never thought I'd be posting my errors on a website to try to help others.
Here are two ballasting mistakes I made.
Ballast Error 1: The top two pictures show what happens when I didn't wet the ballast enough with my 50/50 mixture of rubbing alcohol and didn't use enough glue. The ballast dried and survived my first pass with the vacuum, but a few days down the road, the second pass showed my error as the ballast was sucked up and my roadbed became exposed.
Lesson Learned: Use more mixture and more glue than you need. It will dry!
Ballast Error 2: Here I started with ballast from one company, but found it to not adhere well and didn't like its texture so I switched to a different brand.
Lesson Learned: Test the ballast in a small section of your layout first. Preferably one that's not in plain view. If you like it, continue with it. If you don't, remove what you put down and try a different brand. That's not to say you can't mix and match, but if you have a continuous line as mine is, then you shouldn't have one area with company A ballast and another area with company B ballast.


Track Error: Not using enough caulk to hold the roadbed onto the layout. Since the track has a long curve you need a lot of glue or caulk to hold the roadbed in place. I didn't use enough caulk and over time the pressure was too much and the roadbed came loose from the foam. This caused my cars to tip over and fall off of the layout. I currently have pins, as seen in the photo, holding the roadbed down.
Lesson 1 Learned: Use more caulk, not less. You can always wipe it up before it dries.
Lesson 2 Learned: Do not put tracks, particularly curves, too close to the edge of your layout. If cars derail (or tip) they will wind up on the floor!
Fixable Mistakes
Positioning Error: Here is a picture of a corner of my original layout. The outside track is a piece of flex track and although it was fine for the original layout, when I went to expand I found that because of its positioning, there was no way it was going to line up with the switch track I needed to get to the new portion of my layout. The original bend never really was straight as it curved around the board. This meant I had to rip it up from the board just enough so I could get it lined up with the switch track. Once that was done I had to work on the scenery as it left a big portion of pink foam showing. I never got around to putting new ballast down.
Lesson Learned: If there's the possibility of future expansion then be sure that you plan for that appropriately. Leave some straight areas near the edges to allow for switch tracks.
These are the types of mistakes that you can fix, but the fix requires changing the surroundings in order to fix it. These are also the kinds where you say "Are you serious?!?". They're fixable, but annoying.


Tunnel Restrictions: Never would've thought about this. I have a mountain where the train runs through it. Right before it goes in is a switch track that either sends it up the mountain or through to the container/coal yard. Unfortunately I can't get through the porthole with 2 containers stacked up! Engines with pantographs also can't get through.
Lesson Learned: Account for the height of the roadbed when using portholes. Had I put the porthole at the height of the track, this wouldn't be a problem.

(Logically) Unfix-able Mistakes
These are the mistakes that you cannot change because it would cause serious damage to its surroundings or would require you to change the track layout.
Switch track proximity: My main station has switch tracks on the inside loop which enable trains to enter a siding that puts them up against the raised platform. These switch tracks have motors mounted to the side of them. Unfortunately I put a second switch track too close to another and as passenger cars and locomotives enter the siding they hit the motor of the second turnout and derail. I cut off the pin that you use to manually switch the track, but the motor housing still hits the bottom of the cars as shown in the pictures below.
Lesson 1 Learned: Test out switch tracks that are in close proximity with your longest cars and your cars that come down close to the track. Do the text before you glue the tracks down.
Lesson 2 Learned: Use under the table switch machines when switch tracks are close to each other.


Impossibly Tight Curves: I wanted to model the train station in Hoboken, NJ and wanted the exit to allow trains to go in either direction on the layout. I had limited space to do this, but thought it might work. I was wrong. The curve on the right hand side is so tight that a passenger train couldn't possibly make it. They can make the curve on the left hand side which isn't quite so tight, but even that causes derailments. There is no possible way to fix this and allow it to work as I had intended. As a result, I only use the yard for storage and occasionally will move a train onto the mainline by using the curve on the left. I was so eager to do this that I ignored rationale and did it anyway.
Lesson Learned: Know the limits and test before fixing track in place. Think ahead before starting a big project like a train yard and don't compromise functionality for looks. It may look like a cool passenger station area, but what good is it if you can't use it?


Table Height: I added another table to expand my layout years after creating the main portion of the layout. The addition was made up of two new tables, a big one and a smaller one needed for the transition. The large table was at the correct height, but the smaller one was slightly lower. I had to use foam putty to build up the area under the track in order to make it level. Unfortunately the track is not perfectly level. The switch track to the new section is at the bottom of a down grade so the trains are going faster than usual and once they hit the switch track they go slightly uphill. This causes an awkward transition. It doesn't stop the trains from operating, but the train goes from fast to slow in a short amount of time.
Lesson Learned: Double, triple, and quadruple check table heights when working with multiple tables. If tables are not the same height, use foam putty or other material to adjust the height. Double, triple, and quadruple check that before laying track. Be sure to account for roadbed thickness when doing this.
Grade Crest: The picture below shows the point where my grade increase stops and the decrease begins. At no point does the grade level out before it starts going back down. This causes the track to become curved at the top. While this is not normally a problem, it does sometimes happen where the couplers get out of line and the train separates.
Lesson Learned: Let grades level out before the begin to come back down. Even if it's just for a brief moment, this will enable the couplers to stay better aligned.

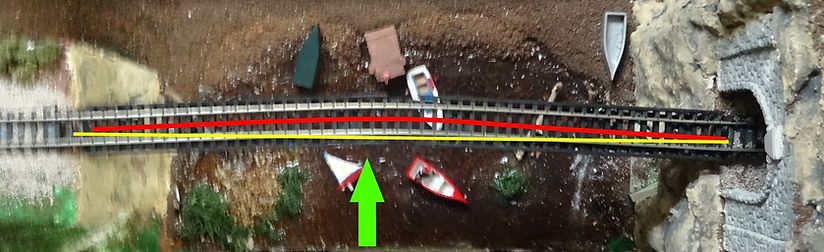
Spacing for Bridges: When I did this bridge on my layout I did not account for the track being held down to the bridge. I laid the track first, which had a curve to it as I mentioned above, and then attached it to the bridge. When I did this, there was more track than needed and it caused the bridge to bow out. Now every time a train goes over the bridge, it has a slight wave to it as seen in the second photo. In order to correct this I would have to cut a tiny piece of track out and reattach it.
Lesson 1 Learned: Do not have a bridge at the point where your track begins to come back down.
Lesson 2 learned: Install any bridges before laying the track. Be sure that the track is firmly seated on the bridge before fixing it in place.
The yellow line shows where the track would be as a straight line and the red shows the the actual path of the track


Layout topography: This last one is more of a design flaw rather than an error. I have this mountain in the corner of the layout, but then there's a cliff drop-off and then the rest of the layout is perfectly flat. In real life, there would be other areas that are also raised. I tried to compensate for this by adding a few smaller raised areas, but even then, they aren't high enough to make it look like they're part of the same mounting.
Lesson Learned: When modeling a mountainous area, be sure that there are other areas of the layout that show signs of being mountainous. Try adding hills where you have houses. You can terrace the area for a more realistic effect. Track can still be level. Just use bridges and underpasses for roads.

Track Planning: In order to get into the Hoboken terminal I needed to have an area weith straight track for the switches. This meant that my curves had to go right to the edge of the layout. I could have made the turn tighter, but then much of my rolling stock and locomotives wouldn't be able to make the curve. If a train derails near the curve it will go right to the cement floor.
Lesson Learned: Don't sacrifice operation and safety for aesthetic purposes. Operation should be t he first priority. This wasd s complete failure because the trains can't use the trach anyway because the curves into the station are too tight as I explained above.

This Y shaped portion of the layout is what forced me to have the curve extend to the edge of the layout.