Carletta Trains
Wiring the Layout
Here are a few of the challenges wiring this layout:
-
Limited space for wires
-
Supports under layout cannot be obstructed by wires
-
Dropping solder on the foam would melt it
What was wired:
-
Track
-
5 buildings
-
13 street, station, and park lights
-
4 flashing LEDs for the police car (plus the fiber optics)
-
Circuit board for 2 LED campfire
-
LED for flashing sign
I wired the track the same way anyone would do basic track wiring. I simply ran 2 wires up through the bottom of the board and soldered them onto the outside of the rails.
When it came to the lights I used the same method to wire the Z scale briefcase layout as I did my larger N scale layout. I have 2 wires running parallel along the bottom of the board that are powered and then attach lights to those wires rather then running everything back to a starting point. I would simply remove the covering on the wire wherever I wanted to solder a light's wire to.
A warning on Marklin street lights: I used Marklin brand lights for the street lights because they looked much better than other brands and were truly to scale. The overall appearance of them is amazing as they illuminate the area beneath them and don't spread their light all over the place as a normal light would do. HERE'S THE ISSUE! These lights are not wired like normal lights. It doesn't simple have 2 wires that you hook up to your power. Instead, there is a thin strip that comes out of the light and has 2 copper contacts at the end. You need to take that contact and insert it into their specially designed microchip by placing it on top and clamping a plastic clip to hold it on. While this may sound fairly easy IT ISN'T. The wire and microchip are so small that it makes it nearly impossible to clamp the clip down without moving the wire out of the way. The microchip then has 2 wires you solder onto the main power wires to power the light. Here is the only process I found that works.
Note: I am specifically referring to their Z scale lights. I don't know if it's the same with the other scales, but I imagine it is
Step 1) Solder the microchip wires to the main power wire.
Step 2) Use any method you can to get the little strip from the light centered over the microchip connection.
Step 3) Try to get the clip down without moving the strip.
Step 4) Turn on the power and pray it lights.
When all else fails: Get your wife (or husband or whoever) to do it. Let her get frustrated enough to the point where she's only doing it to prove she can do it. If she threatens to give up, offer help.
Once the strip is clipped in do not attempt to move the strip around. It will break. Remove the clip, reposition, and try it again.
Once the strip is clipped in do not attempt to move the strip around. It will break. Remove the clip, reposition, and try it again.

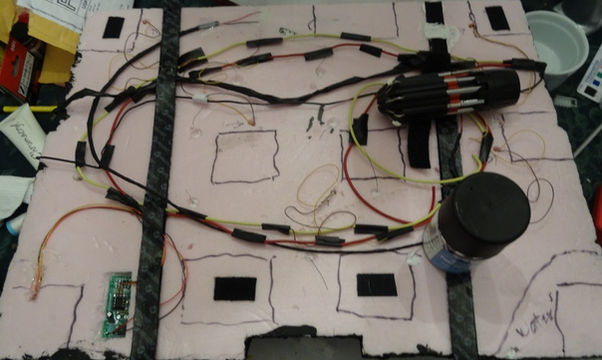
This photo shows the wires, unrestrained, and currently only wired to the track, buildings, and campfire. You can see where I've removed some of the sheathing in preparation to wire the streetlights that you can see poking through the bottom of the board. The black squares are where the bottom of the board has a support under it and wires cannot be in that area.
You can see that my campfire wire in the bottom left comes out where there's a support. I had to cut away a channel so that it wouldn't interfere with the support and make the layout crooked when in the briefcase.
Because the buildings are so small in Z scale I had to recess all of the building lights into the foam board. The first two images show the light for the Post Office before and after I added the gravel parking lot. The third photos shows the light for the shack which I had to cut the legs off of because they stuck out beyond the edges of the shack.


